
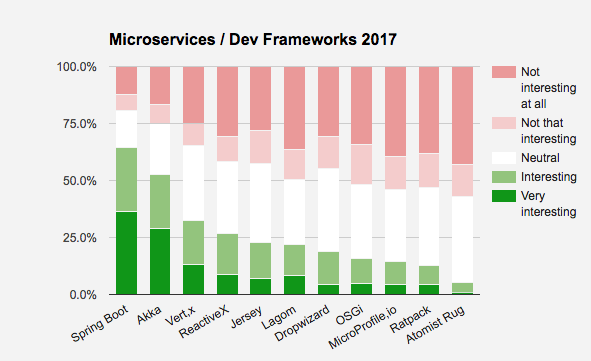
Spring boot is one of the most used and trending frameworks. The ease of use, the strong and lovely community and its powerful features makes Spring Boot one the most popular dev frameworks of 2017
In this post, we'll go behind the scenes and dig into the magic behind the Spring Boot autoconfiguration, make and explore a starter of our own as well.
Why do we need it ?
Spring Boot autoconfiguration represents a way to automatically configure a Spring application based on the dependencies that are present on the classpath, all without much effort required from us, as developers. The secret behind this power actually comes from Spring itself or rather from the Java Configuration functionality that it provides. As we add more starters as dependencies, more and more classes will be added to our classpath. Spring Boot detects the presence or absence of specific classes and based on this information, makes some decisions, which are not simple and fairly complicated at times, and automatically creates and wires the necessary beans to the application context.
This powerful capability is very helpful and open a whole new world of isage. Let's say for example, We can create custom starters that would automatically add some of the configuration or functionalities to our applications.
How it works then ?!
The first step toward understanding how Spring boot autoconfiguration works, is to analyse the output of the AUTO-CONFIGURATION REPORT by enabling the DEBUG mode of our spring boot application. This is a (very) small selection of what I got for my reactive aircraft app:
============================
CONDITIONS EVALUATION REPORT
============================


Positive matches:
-----------------
...
   MongoReactiveDataAutoConfiguration#reactiveMongoDatabaseFactory matched:
      - @ConditionalOnMissingBean (types: org.springframework.data.mongodb.ReactiveMongoDatabaseFactory; SearchStrategy: all) did not find any beans (OnBeanCondition)

   MongoReactiveDataAutoConfiguration#reactiveMongoTemplate matched:
      - @ConditionalOnMissingBean (types: org.springframework.data.mongodb.core.ReactiveMongoTemplate; SearchStrategy: all) did not find any beans (OnBeanCondition)

   MongoReactiveRepositoriesAutoConfiguration matched:
      - @ConditionalOnClass found required classes 'com.mongodb.reactivestreams.client.MongoClient', 'org.springframework.data.mongodb.repository.ReactiveMongoRepository'; @ConditionalOnMissingClass did not find unwanted class (OnClassCondition)
      - @ConditionalOnRepositoryType configured type of 'AUTO' matched required type (OnRepositoryTypeCondition)
      - @ConditionalOnMissingBean (types: org.springframework.data.mongodb.repository.support.ReactiveMongoRepositoryFactoryBean,org.springframework.data.mongodb.repository.config.ReactiveMongoRepositoryConfigurationExtension; SearchStrategy: all) did not find any beans (OnBeanCondition)

   ThymeleafAutoConfiguration.ThymeleafJava8TimeDialect#java8TimeDialect matched:
      - @ConditionalOnMissingBean (types: org.thymeleaf.extras.java8time.dialect.Java8TimeDialect; SearchStrategy: all) did not find any beans (OnBeanCondition)

   ThymeleafAutoConfiguration.ThymeleafReactiveConfiguration matched:
      - found ReactiveWebApplicationContext (OnWebApplicationCondition)
      - @ConditionalOnProperty (spring.thymeleaf.enabled) matched (OnPropertyCondition)

...

Negative matches:
-----------------

   ActiveMQAutoConfiguration:
      Did not match:
         - @ConditionalOnClass did not find required classes 'javax.jms.ConnectionFactory', 'org.apache.activemq.ActiveMQConnectionFactory' (OnClassCondition)

   AopAutoConfiguration:
      Did not match:
         - @ConditionalOnClass did not find required classes 'org.aspectj.lang.annotation.Aspect', 'org.aspectj.lang.reflect.Advice', 'org.aspectj.weaver.AnnotatedElement' (OnClassCondition)

   ArtemisAutoConfiguration:
      Did not match:
         - @ConditionalOnClass did not find required classes 'javax.jms.ConnectionFactory', 'org.apache.activemq.artemis.jms.client.ActiveMQConnectionFactory' (OnClassCondition)

...
For each line of the report, Spring Boot tells us why certain configurations have been selected to be included, what they have been positively matched on, or, for the negative matches, what was missing that prevented a particular configuration to be included in the mix. Let’s look at the positive match for MongoReactiveRepositoriesAutoConfiguration:
- The
@ConditionalOnClassclasses found tells us that Spring Boot has detected the presence of a particular class, specifically two classes in our case:com.mongodb.reactivestreams.client.MongoClientandorg.springframework.data.mongodb.repository.ReactiveMongoRepository. - The
OnClassConditionindicates the kind of matching that was used. This is supported by the@ConditionalOnClassand@ConditionalOnMissingClassannotations.
While OnClassCondition is the most common kind of detection, Spring Boot also uses many other conditions. For example, OnBeanCondition is used to check the presence or absence of specific bean instances, OnPropertyCondition is used to check the presence, absence, or a specific value of a property as well as any number of the custom conditions that can be defined using the @Conditional annotation and Condition interface implementations. More detail can be found here
The negative matches show us a list of configurations that Spring Boot has evaluated, which means that they do exist in the classpath and were scanned by Spring Boot but didn’t pass the conditions required for their inclusion. ActiveMQAutoConfiguration, while available in the classpath as it is a part of the imported spring-boot-autoconfigure artifact, was not included because the required org.apache.activemq.ActiveMQConnectionFactory class was not detected as present in the classpath, thus failing the OnClassCondition.
Example of Custom Autoconfiguration: Minio starter
Few weeks ago, I started working on a minio starter that autoconfigures a minio client. We'll use it as example to discuss how to make a spring boot starter of our own :)
First thing to do is creating the starter pom which contains the dependencies for the auto-configure module. The naming convention for all the starters which are not managed by the core Spring Boot team should start with the library name followed by the suffix XXX-spring-boot-starter (i.e minio-springboot-starter).
Worth nothing to mention that Spring Boot Autoconfiguration Starters are nothing more than a regular Spring Java Configuration class annotated with the @Configuration annotation and the presence of spring.factories in the classpath in the META-INF directory with the appropriate configuration entries.
With that being said, let's start digging into our starter. First, I've called our autoconfigure module miniospringbootautoconfigure. This module will have three main classes, among others, i.e. MinioProperties which will enable setting custom properties through application.properties file, MinioTemplate to wrap minio API and MinioAutoConfiguration which will create the beans for minio starter.
@Configuration
@EnableConfigurationProperties({ MinioProperties.class })
public class MinioAutoConfiguration {

    @Autowired
    private MinioProperties properties;

    @Bean
    @ConditionalOnMissingBean(MinioTemplate.class)
    @ConditionalOnProperty(name = "minio.url")
    MinioTemplate template(){
        return new MinioTemplate(
                properties.getUrl(),
                properties.getAccessKey(),
                properties.getSecretKey()
        );
    }
}
On application startup, the MinioAutoConfiguration class will run if the property minio.url is present in the classpath. If run successfully, it will populate the Spring application context with MinioTemplate bean by reading the properties via MinioProperties class.
The @ConditionalOnMissingBean annotation will ensure that beans will only be created if they don’t already exist. This allow us to completely override the autoconfigured beans by defining our own in one of the @Configuration classes.
As mentioned above, the next mandatory step is registering the MinioAutoConfiguration as an auto-configuration candidate, by adding it under the key org.springframework.boot.autoconfigure.EnableAutoConfiguration in the standard file resources/META-INF/spring.factories:
org.springframework.boot.autoconfigure.EnableAutoConfiguration=me.aboullaite.minio.MinioAutoConfiguration
What happen is, during the application startup, Spring Boot uses SpringFactoriesLoader, which is a part of Spring Core, in order to get a list of the Spring Java Configurations that are configured for the org.springframework.boot.autoconfigure.EnableAutoConfiguration property key. Under the hood, this call collects all the spring.factories files located in the META-INF directory from all the jars or other entries in the classpath and builds a composite list to be added as application context configurations.
This should gave you an overview of what our minio starter does.
The very final step and in order to use our starter, we need to add its dependency to a spring boot application:
<dependency>
 <groupId>me.aboullaite</groupId>
 <artifactId>minio-springboot-starter</artifactId>
 <version>${minio-starter-version}</version>
</dependency>
And voila! Please feel free to comment the section below for any question, suggestion or update ;)