My first Messenger Bot, using Java.
Last month I've joined the Facebook DevC family as DevC Casablanca Lead. Developer Circle is a community supported by Facebook, and aims creating active communities for developers around the world to access information, share knowledge, and collaborate with other developers.
As a DevC Lead, One of my roles is to encourage Moroccan Developers to participate to Bots for Messenger Challenge, but wait... how I'm supposed to do that if I've never developed a bot for messenger!! and this is how my bot journey starts.
I'm a JVM fan Boy, so the first thing I did was looking on Facebook documentation if there is a getting started guide using any of the many JVM langages! Unfortunately, none found. The official documentation showcase uses only nodeJS. So I did as any good developer would do, follow the doc and understand it using [yes, exactly!] NodeJS. Once done, I started searching for any java library that could help me during my journey, and hope, I found it. It's called Messenger4J. Good, solid and simple library that covers my need.
Spring Bot
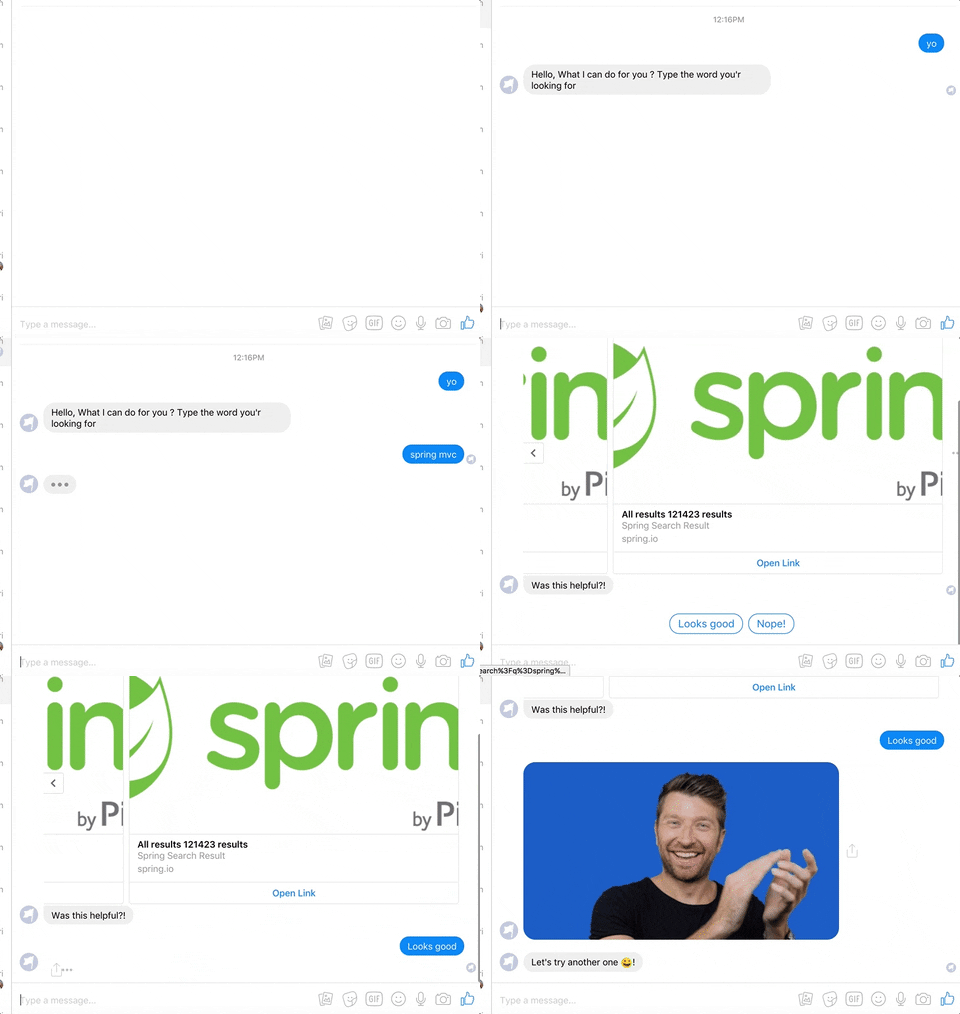
I like Spring Boot and how it makes our lives, as developers, much easier, productive and straightforward to get things done. Which says, I spent so much time on the spring Documentation website, and from here comes my idea: Why not developing a bot, that simplifies things more [Btw, I'm a lazy developer], and all what I need is to type a text, and the bot return back the top articles. It'd be fun, isn't ? here is the final result:

Fork it!
The code source is available on github. It contains one Controller class CallBackHandler which obviously handle all communication coming from WebHook.
The CallBackHandler constructor takes 2 parameters:
- App secret: That can be fount on the App dashboard
- Verification Token: A secret value that will be sent to your bot, in order to verify the request is coming from Facebook.
The constructor also, initialize the MessengerReceiveClient that delegates, based on inbound event types (text, attachement ...) the processing to the adequate handler:
public CallBackHandler(@Value("${messenger4j.appSecret}") final String appSecret,
                                        @Value("${messenger4j.verifyToken}") final String verifyToken,
                                        final MessengerSendClient sendClient) {

    logger.debug("Initializing MessengerReceiveClient - appSecret: {} | verifyToken: {}", appSecret, verifyToken);
    this.receiveClient = MessengerPlatform.newReceiveClientBuilder(appSecret, verifyToken)
            .onTextMessageEvent(newTextMessageEventHandler())
            .onQuickReplyMessageEvent(newQuickReplyMessageEventHandler())
            .onPostbackEvent(newPostbackEventHandler())
            .onAccountLinkingEvent(newAccountLinkingEventHandler())
            .onOptInEvent(newOptInEventHandler())
            .onEchoMessageEvent(newEchoMessageEventHandler())
            .onMessageDeliveredEvent(newMessageDeliveredEventHandler())
            .onMessageReadEvent(newMessageReadEventHandler())
            .fallbackEventHandler(newFallbackEventHandler())
            .build();
    this.sendClient = sendClient;
}
The controller has also 2 endPoints:
-
GET /callback: It looks for the
Verify Tokenand respond with the challenge sent in the verification request. -
POST /callback: Responsible for processing the inbound messages and events.
  @RequestMapping(method = RequestMethod.GET)
  public ResponseEntity<String> verifyWebhook(@RequestParam("hub.mode") final String mode,
                                          @RequestParam("hub.verify_token") final String verifyToken,
                                          @RequestParam("hub.challenge") final String challenge) {

  logger.debug("Received Webhook verification request - mode: {} | verifyToken: {} | challenge: {}", mode,
          verifyToken, challenge);
  try {
      return ResponseEntity.ok(this.receiveClient.verifyWebhook(mode, verifyToken, challenge));
  } catch (MessengerVerificationException e) {
      logger.warn("Webhook verification failed: {}", e.getMessage());
      return ResponseEntity.status(HttpStatus.FORBIDDEN).body(e.getMessage());
  }
  }


  @RequestMapping(method = RequestMethod.POST)
  public ResponseEntity<Void> handleCallback(@RequestBody final String payload,
                                         @RequestHeader("X-Hub-Signature") final String signature) {

  logger.debug("Received Messenger Platform callback - payload: {} | signature: {}", payload, signature);
  try {
      this.receiveClient.processCallbackPayload(payload, signature);
      logger.debug("Processed callback payload successfully");
      return ResponseEntity.status(HttpStatus.OK).build();
  } catch (MessengerVerificationException e) {
      logger.warn("Processing of callback payload failed: {}", e.getMessage());
      return ResponseEntity.status(HttpStatus.FORBIDDEN).build();
  }
  }
With that said, now if I send a text message to my bot, the controller will check it and delegate it to the TextMessageEventHandler and so on.
My TextMessageEventHandler is a pretty simple one:
private TextMessageEventHandler newTextMessageEventHandler() {
    return event -> {
        logger.debug("Received TextMessageEvent: {}", event);

        final String messageId = event.getMid();
        final String messageText = event.getText();
        final String senderId = event.getSender().getId();
        final Date timestamp = event.getTimestamp();

        logger.info("Received message '{}' with text '{}' from user '{}' at '{}'",
                messageId, messageText, senderId, timestamp);

        try {
            switch (messageText.toLowerCase()) {


                case "yo":
                    sendTextMessage(senderId, "Hello, What I can do for you ? Type the word you're looking for");
                    break;

                case "great":
                    sendTextMessage(senderId, "You're welcome :) keep rocking");
                    break;


                default:
                    sendReadReceipt(senderId);
                    sendTypingOn(senderId);
                    sendSpringDoc(senderId, messageText);
                    sendQuickReply(senderId);
                    sendTypingOff(senderId);
            }
        } catch (MessengerApiException | MessengerIOException e) {
            handleSendException(e);
        } catch (IOException e) {
            handleIOException(e);
        }
    };
  }
Notice that if you typed anything except Yo or Great the bot well consider it as a search key (Not that clever, I know :P). I'm using Jsoup library, that makes a request to spring doc page and extracts its data:
 private void sendSpringDoc(String recipientId, String keyword) throws MessengerApiException, MessengerIOException, IOException {

    Document doc = Jsoup.connect(("https://spring.io/search?q=").concat(keyword)).get();
    String countResult = doc.select("div.search-results--count").first().ownText();
    Elements searchResult = doc.select("section.search-result");
    List<SearchResult> searchResults = searchResult.stream().map(element ->
                    new SearchResult(element.select("a").first().ownText(),
            element.select("a").first().absUrl("href"),
            element.select("div.search-result--subtitle").first().ownText(),
            element.select("div.search-result--summary").first().ownText())
            ).limit(3).collect(Collectors.toList());

    final List<Button> firstLink = Button.newListBuilder()
            .addUrlButton("Open Link", searchResults.get(0).getLink()).toList()
            .build();
final List<Button> secondLink = Button.newListBuilder()
            .addUrlButton("Open Link", searchResults.get(1).getLink()).toList()
            .build();
final List<Button> thirdtLink = Button.newListBuilder()
            .addUrlButton("Open Link", searchResults.get(2).getLink()).toList()
            .build();
final List<Button> searchLink = Button.newListBuilder()
            .addUrlButton("Open Link", ("https://spring.io/search?q=").concat(keyword)).toList()
            .build();

    final GenericTemplate genericTemplate = GenericTemplate.newBuilder()
            .addElements()
            .addElement(searchResults.get(0).getTitle())
            .subtitle(searchResults.get(0).getSubtitle())
            .itemUrl(searchResults.get(0).getLink())
            .imageUrl("https://upload.wikimedia.org/wikipedia/en/2/20/Pivotal_Java_Spring_Logo.png")
            .buttons(firstLink)
            .toList()
            .addElement(searchResults.get(1).getTitle())
            .subtitle(searchResults.get(1).getSubtitle())
            .itemUrl(searchResults.get(1).getLink())
            .imageUrl("https://upload.wikimedia.org/wikipedia/en/2/20/Pivotal_Java_Spring_Logo.png")
            .buttons(secondLink)
            .toList()
            .addElement(searchResults.get(2).getTitle())
            .subtitle(searchResults.get(2).getSubtitle())
            .itemUrl(searchResults.get(2).getLink())
            .imageUrl("https://upload.wikimedia.org/wikipedia/en/2/20/Pivotal_Java_Spring_Logo.png")
            .buttons(thirdtLink)
            .toList()
            .addElement("All results " + countResult)
            .subtitle("Spring Search Result")
            .itemUrl(("https://spring.io/search?q=").concat(keyword))
            .imageUrl("https://upload.wikimedia.org/wikipedia/en/2/20/Pivotal_Java_Spring_Logo.png")
            .buttons(searchLink)
            .toList()
            .done()
            .build();

    this.sendClient.sendTemplate(recipientId, genericTemplate);

}
Nothing much left to say, the rest is pretty obvious.
Run the app
First thing you need to do is to setup a Facebook app, Please follow this link for more details. You'll need also a free hosting service like Heroko or Clever Cloud, or you can simply use NGROK, and don't forget to create a Facebook page.
Once all done, follow this steps:
- open https://developers.facebook.com/apps
click the 'Add a New App' button - enter the Display Name, e.g. spring-bot
select the Category: 'Apps for Messenger' - click the 'Create App ID' button
- Section 'Token Generation': Select your created FB Page
- copy the 'Page Access Token' to the clipboard
- copy it to your
application.yml - navigate to 'Dashboard'
- copy the 'App Secret' to the clipboard
- copy it to your
application.yml - use a randomly generated string as 'Verify Token'
- deploy you app, and copy your public HTTPS URL (callback url)
- navigate back to 'Messenger'
- Section 'Webhooks': Click the 'Setup Webhooks' button
- past the Callback URL and your verify token
- select the following Subscription Fields:
messages,messaging_postbacks,messaging_optins,message_deliveries,message_reads,message_echoes - click the 'Verify and Save' button
- Section 'Webhooks': Select your created FB Page to subscribe your webhook to the page events
- click the 'Subscribe' button
With all that done, Now you can play with your chatbot!
Submit Your App to be Reviewed
While you’re testing your bot, only you and other Page admins can message with the bot directly. You have to go through a review process before your bot is open to the world, ready to chat with anyone.
Facebook seems to be very thorough in their review process, and with good reason. The code for a messaging bot runs on your own servers and could change at any time, without Facebook knowing.
They seem to be trying hard to make sure you’re a good actor, and not submitting a simple dummy app to get approved, only to change it to some spam bot down the road.
Obviously, they could still revoke your API access tokens if you did that, but they’d rather not have any abuse on the Messenger platform at all.
To find more information about the approval process, follow this link.
That's all, hopefully you’ve learned a thing or two about how to build a simple java based chat bot for Facebook Messenger.

