Continuous deployment with Maven, Jenkins and WAS
I'm not a big fan of Websphere application server (at all), but I found myself lately dealing with it and I think it worth sharing my small experience with WAS on setting up a CD pipeline using Jenkins CI. This write up is based on WAS 8.5.5 and Jenkins 2.89.
Pre-Setup
To achieve this goal, we'll be using Websphere deployer plugin that you should add/install to your Jenkins. Once done, go to $JENKINS_HOME/websphere-deployer/WEB-INF/lib and copy the following jars:
com.ibm.ws.admin.client_8.5.0.jarcom.ibm.ws.orb_8.5.0.jar
These jars live on $WAS_INSTALL_ROOT/AppServer/runtimes folder on your websphere server. Don't forget to restart Jenkins to make changes effective ;)
Exporting WAS certificates
Before continuing our Jenkins configuration, we need to download the certificate of WAS to overcome the security exception through https. This step is critical to avoid (many) HTTPS exceptions you my face. I learned it the hard way, since I spent many hours debugging what's going wrong before realising what was an SSL issue :/
For this, open WAS admin console on your browser. Since WAS use a self signed certificate, you need to add an exception for it (make sure the certificate is not expired :P) and then download it and save it somewhere.

Importing WAS certificates to Jenkins
After that, copy the newly saved certificate to Jenkins server, Next, we'll import the certificate it to the JDK cacerts file located in {JAVA_HOME}/jre/lib/security using the following command:
keytool -import -trustcacerts -alias awsJenkinsCert -file $Cert_Path -keystore $JAVA_HOME/jre/lib/security/cacerts”
You'll be asked to enter the keystore password, just type the default changeit.
We will also need to copy DummyClientKeyFile.jks and DummyClientTrustFile.jks to some folder accessible for Jenkins. these files are located on $$WAS_INSTALL_ROOT/AppServer/profiles/<profileName>/etc/ folder on the WAS server.
Jenkins Pipeline Configuration
Now we're ready to go! Create a new Job item selecting the Maven project as the item type. Then configure your git repository as well. Under Build enter the location of your base pom.xml file and your maven goals (or simply clean install).
Since we want to deploy only after successful build, we will activate post build steps (deployment) only for working builds. So we need to select "Run only if build succeeds" under "Post Steps" on Jenkins.

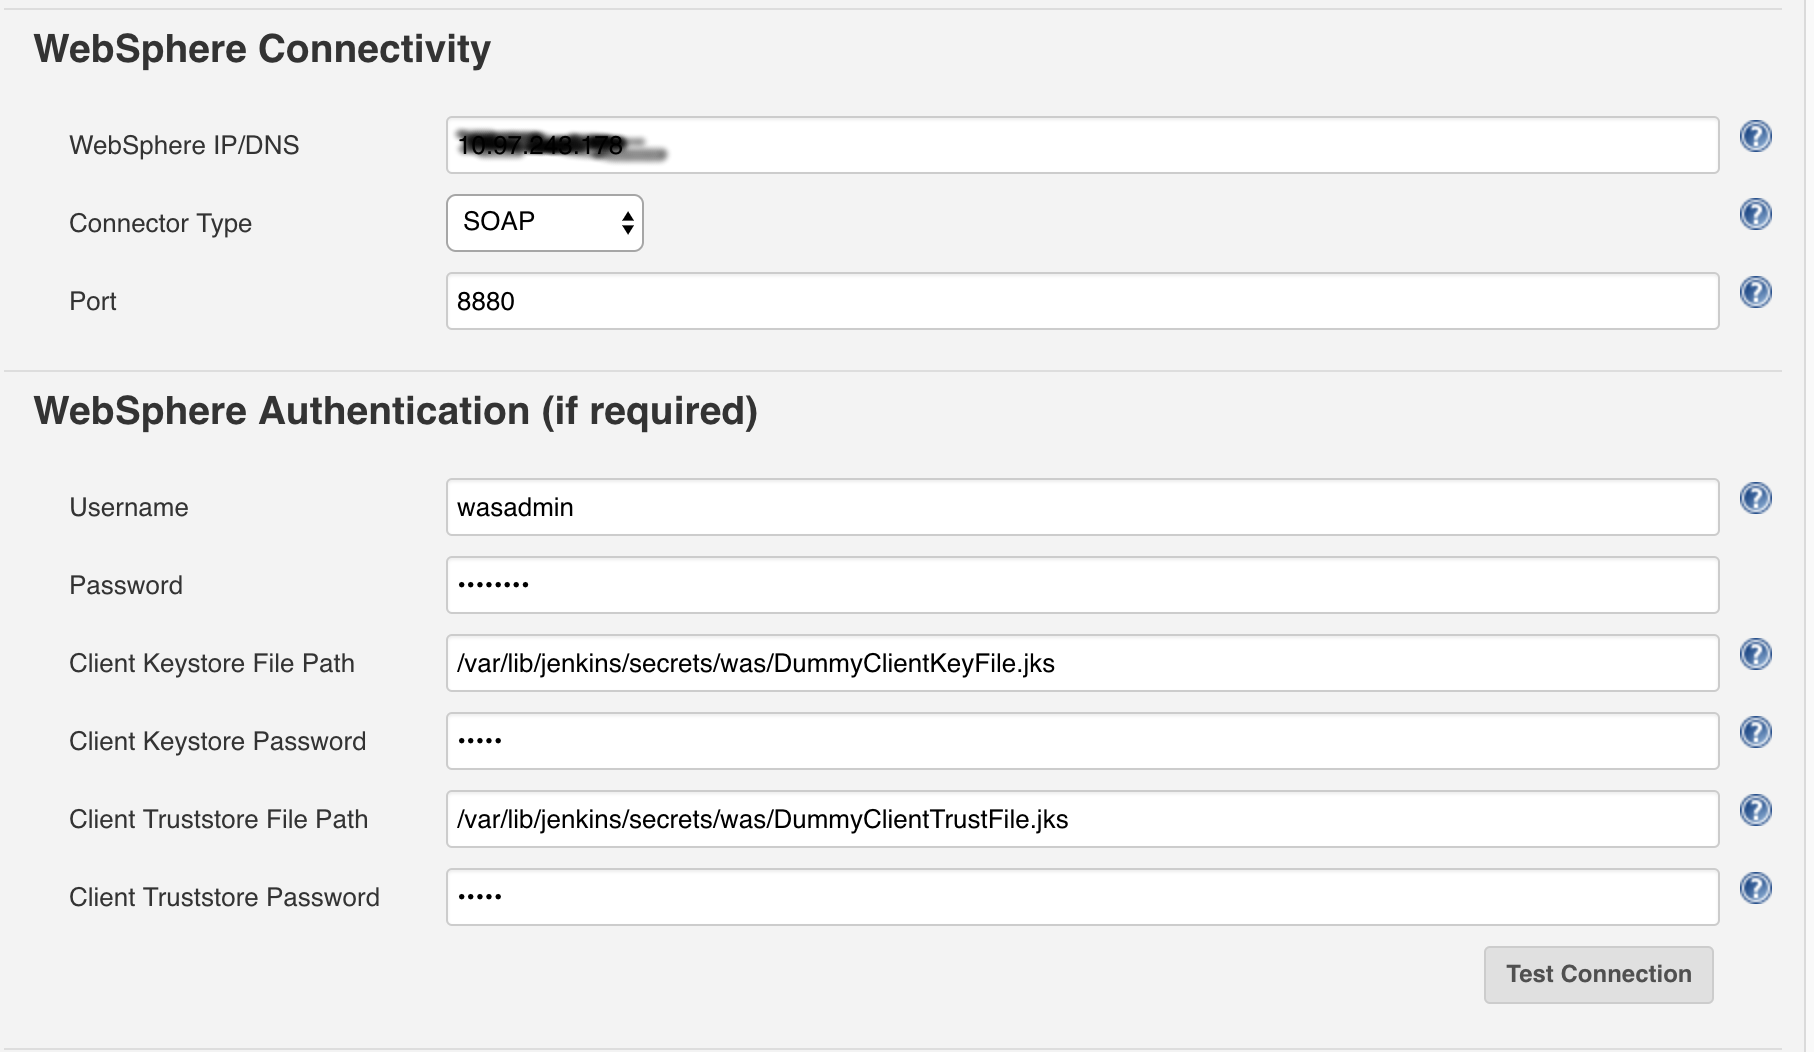
Select "Add post-build action" and select "Deploy To IBM WebSphere Application Server". make sure to fill the form with the required info:
- Enter the IP/DNS of WebSphere Application Server
- Enter the Port to connect on. The port settings can be retrieved from the WebSphere settings (Application servers > server1 > Ports > SOAP_CONNECTOR_ADDRESS).
- Select SOAP as the connect type
- In Websphere Authentication, enter the username and password associated with WebSphere's Admin Console.
- Give the paths for
DummyClientKeyFile.jks,DummyClientTrustFile.jksfiles. - The default passwords for both the files is
WebAS
Click on “Test Connection”, you can see the “Connection Successful!” message. In case the connection isn't working, a (scary) stacktrace will show up on the page.

For the EAR Path you should select the last successful build artifact by specifing
modules/**/lastSuccessful/**/continuous-dev-cycle-example-*.war
The settings for the "Target Node", the "Target Cell" and the "Target Server" depend on your installation. However all values can be retrieved from WebSpheres Administrative Console. Also I've used Java EE 6 as the "Generated EAR Level".
That's pretty much it! You can now push the code to trigger the build and enjoy the deployment ;)

