
I am a developer, and I've (as you've) heard a lot about machine learning and neural networks ... and whenever I decide to take my first step, I find myself dealing with something like:
CNNs use a variation of multilayer perceptrons designed to require minimal preprocessing. They are also known as shift invariant or space invariant artificial neural networks (SIANN), based on their shared-weights architecture and translation invariance characteristics. Wikipedia
What!!! This kind of explanations pushed me a while from moving on, until I read some articles and saw some talks (like this one), confirming that Machine learning should be more fun. Before continuing, please keep in mind that I'm not an expert,I'm far away from that, I'm just counting my very first steps and wanted to share my experience throughout this article about building and using CNN using Deeplearning4j.
Introduction
As a human, we intuitively know that pictures have a hierarchy or conceptual structure. Consider this picture:
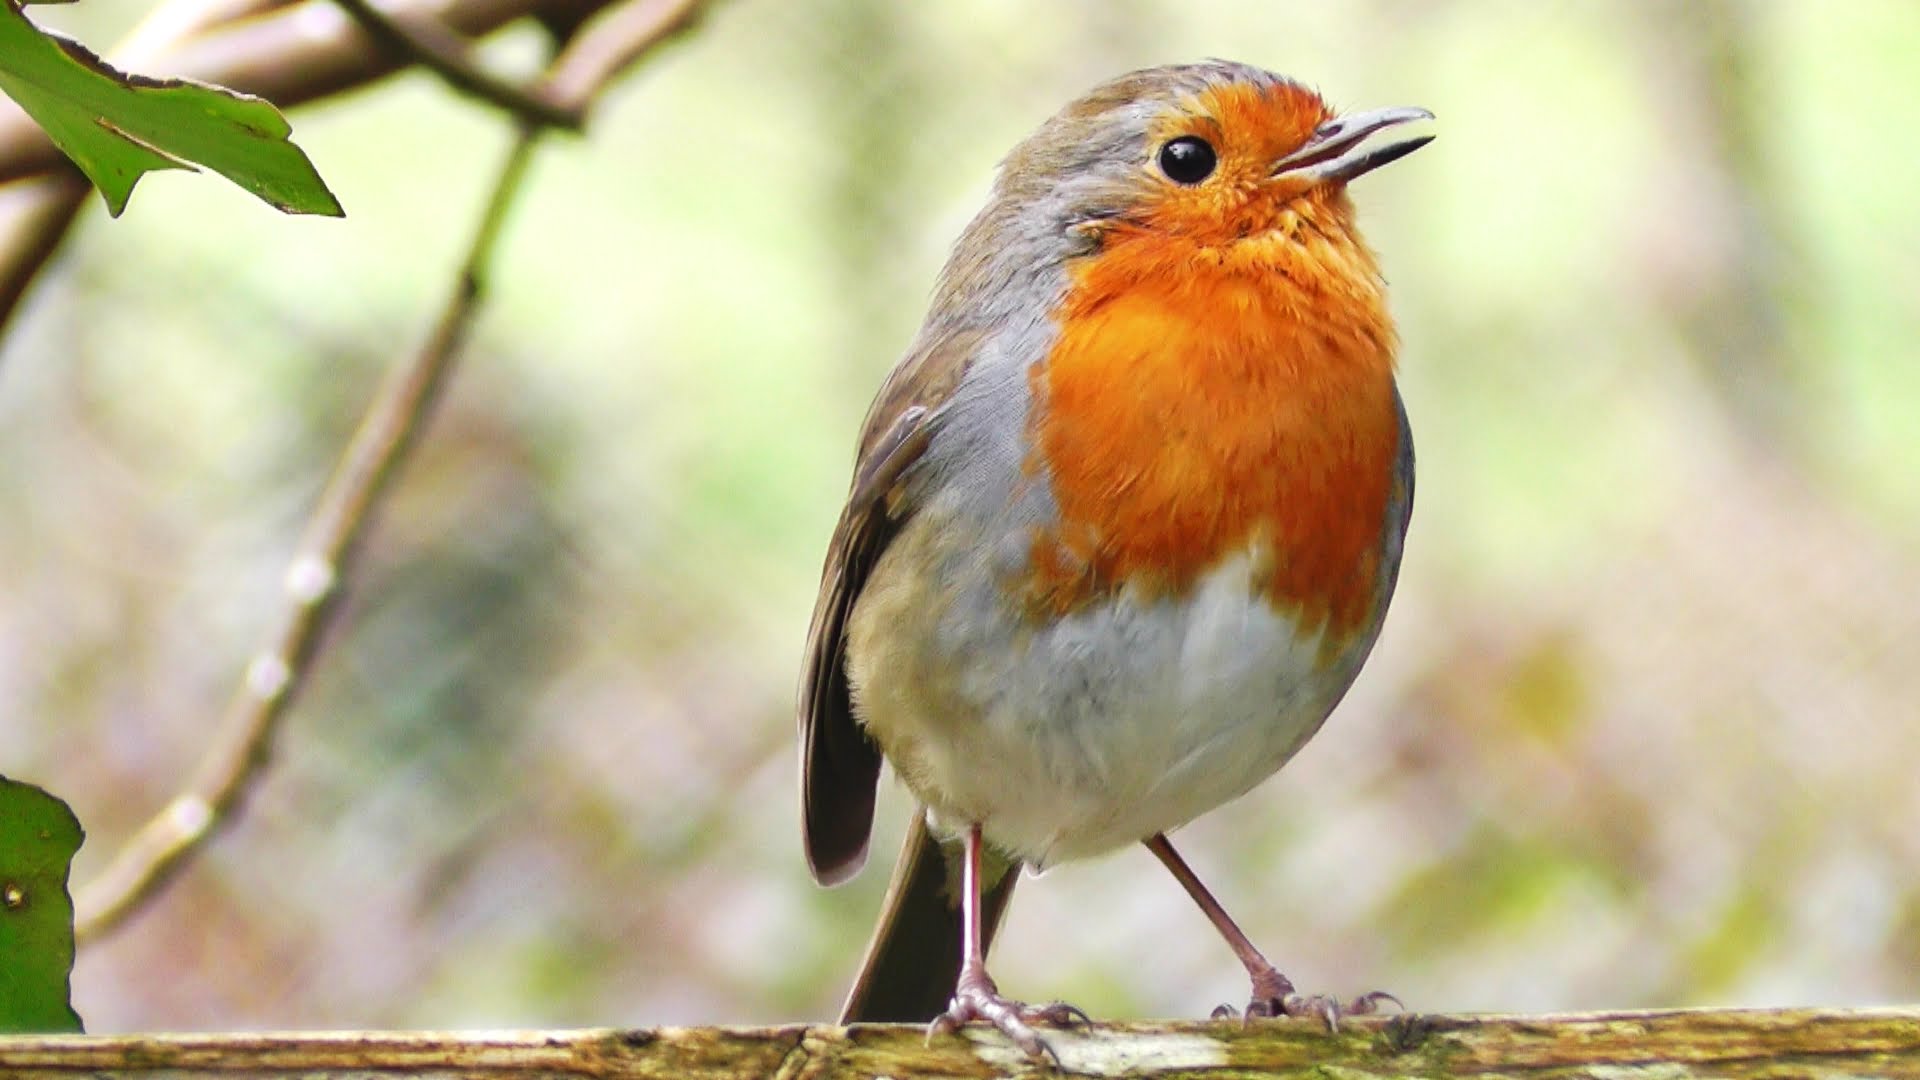
We instantly recognize the hierarchy in this picture:
- There is a bird standing on a branch
- part of leafs
- some branchs
- A blurry nature background
Most importantly, we recognize the idea of a bird no matter what position the bird take. We don’t have to re-learn the idea of child for every possible place it could appear on.
But how can machines do the same thing ?! how they can understand that moving an object around in the picture doesn’t make it something different. This means a machine has to learn to identify each object in every possible position. We’ll do this using a process called Convolution.
What is CNN
Instead of feeding entire images into the neural network as one grid of numbers, we’re going to do something a lot smarter that takes advantage of the idea that an object is the same no matter where it appears in a picture.
Here’s how it’s going to work:
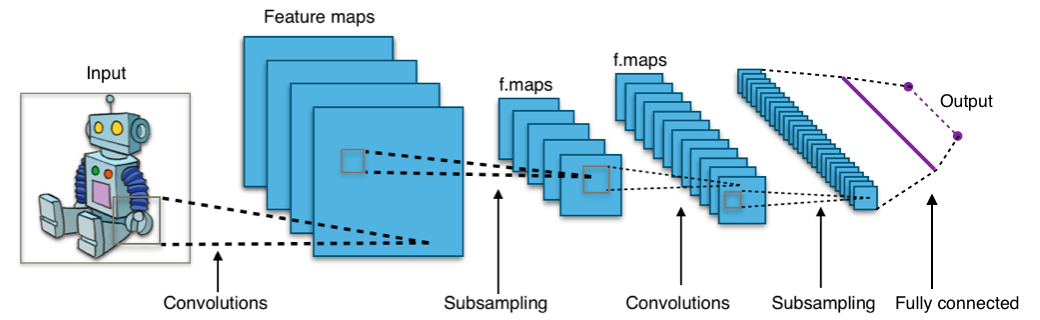
- Splitting image into overlapping image tiles
- Feeding each tile into a small neural network
- If something interesting appears in any tile, we mark it. Note that we keep the same neural network weights for every single tile in the same original image.
- Save the results from each tile into a new array
- For each image, we end up with an array that maps out which parts of the original image are the most interesting.(convolution)
- Next, we run sub-sampling strategy, which help us to reduce image array, by keeping the most interesting bits. (max-pooling)
- We feed our smaller array from the previous as input into another neural network.
- decide if it's a match or not. (fully-connected network)
Of course this is an over-simplified version of CNN. to solve real world problems, these steps can be combined and stacked as many times as we want! we can use two, three or even ten convolution layers. We can throw in max-pooling wherever we want to reduce the size of your data.
The basic idea is to start with a large image and continually boil it down, until we finally have a single result. The more convolution steps we have, the more complicated features our network will be able to learn to recognize.
Building a Bird Classifier
As I'm a developer, my prefered way to master concepts is by getting hans on the and putting it in action. For that, we're going to write a program that can decide if a picture is a bird or not!
Dataset
Whenever we talk about writing ML programs, first thing that comes to mind is the dataset. for our little program, We'll be using the free CIFAR10 dataset that contains 6,000 pictures of birds and 51,000 pictures of things that are not birds. Also, to get even more data we’ll also add in the Caltech-UCSD Birds-200–2011 dataset that has another 11,000 bird pics. This dataset will work fine for our purposes, but 68,000 low-res images is still pretty small for real-world applications.
our dataset folder looks something like this:
|-- dataset
|   |-- bird
|   |   |-- bird1.png
|   |   |-- bird2.png
|   |   |-- ....
|   |-- not-bird
|   |   |-- car.png
|   |   |-- horse.png
|   |   |-- ....
The CIFAR10 dataset has a unique format: 32x32, BGR format. However, Caltech-UCSD dataset contains images each with different size, which mean that'll need to resize these images to same dimensions (32x32) to match the first dataset.
Train and Save model
The BirdClassification class aims to train and save our trained model for future use. the code is below:
public class BirdClassification {
    private static final Logger log = LoggerFactory.getLogger(BirdClassification.class);
    protected static int height=32;
    protected static int width=32;

    protected static int channels = 3;
    protected static int batchSize=150;// tested 50, 100, 200
    protected static long seed = 123;
    protected static Random rng = new Random(seed);
    protected static int iterations = 1;
    protected static int nEpochs = 150; // tested 50, 100, 200
    protected static double splitTrainTest = 0.8;
    protected static boolean save = true;
    private int numLabels;

    public void execute(String args[]) throws Exception{

        log.info("Loading data....");

        /**
         * Setting up data
         */
        ParentPathLabelGenerator labelMaker = new ParentPathLabelGenerator();
        File mainPath = new File("/Users/aboullaite/Downloads/dataset");
        FileSplit fileSplit = new FileSplit(mainPath, NativeImageLoader.ALLOWED_FORMATS, rng);
        int numExamples = Math.toIntExact(fileSplit.length());
        numLabels = fileSplit.getRootDir().listFiles(File::isDirectory).length; //This only works if your root is clean: only label subdirs.
        BalancedPathFilter pathFilter = new BalancedPathFilter(rng, labelMaker, numExamples, numLabels, batchSize);

        /**
         * Split data: 80% training and 20% testing
         */
        InputSplit[] inputSplit = fileSplit.sample(pathFilter, splitTrainTest, 1 - splitTrainTest);
        InputSplit trainData = inputSplit[0];
        InputSplit testData = inputSplit[1];

        /**
         *  Create extra synthetic training data by flipping, rotating
         #  images on our data set.
         */
        ImageTransform flipTransform1 = new FlipImageTransform(rng);
        ImageTransform flipTransform2 = new FlipImageTransform(new Random(123));

        List<ImageTransform> transforms = Arrays.asList(new ImageTransform[]{flipTransform1, flipTransform2});
        /**
         * Normalization
         **/
        log.info("Fitting to dataset");
        ImagePreProcessingScaler preProcessor = new ImagePreProcessingScaler(0, 1);
        /**
         * Define our network architecture:
          */
        log.info("Build model....");
        MultiLayerConfiguration conf = new NeuralNetConfiguration.Builder()
                .seed(seed)
                .iterations(iterations)
                .regularization(false).l2(0.005) // tried 0.0001, 0.0005
                .activation(Activation.RELU)
                .learningRate(0.05) // tried 0.001, 0.005, 0.01
                .weightInit(WeightInit.XAVIER)
                .optimizationAlgo(OptimizationAlgorithm.STOCHASTIC_GRADIENT_DESCENT)
                .updater(Updater.ADAM)
                .list()
                .layer(0, convInit("cnn1", channels, 32 ,  new int[]{5, 5}, new int[]{1, 1}, new int[]{0, 0}, 0))
                .layer(1, maxPool("maxpool1", new int[]{2,2}))
                .layer(2, conv3x3("cnn2", 64, 0))
                .layer(3, conv3x3("cnn3", 64,1))
                .layer(4, maxPool("maxpool2", new int[]{2,2}))
                .layer(5, new DenseLayer.Builder().activation(Activation.RELU)
                        .nOut(512).dropOut(0.5).build())
                .layer(6, new OutputLayer.Builder(LossFunctions.LossFunction.RECONSTRUCTION_CROSSENTROPY)
                        .nOut(numLabels)
                        .activation(Activation.SOFTMAX)
                        .build())
                .backprop(true).pretrain(false)
                .setInputType(InputType.convolutional(height, width, channels))
                .build();
        MultiLayerNetwork network = new MultiLayerNetwork(conf);

        network.init();
        // Visualizing Network Training
        UIServer uiServer = UIServer.getInstance();
        StatsStorage statsStorage = new InMemoryStatsStorage();
        uiServer.attach(statsStorage);
        network.setListeners((IterationListener) new StatsListener( statsStorage),new ScoreIterationListener(iterations));

        /**
         * Load data
         */
        log.info("Load data....");
        ImageRecordReader recordReader = new ImageRecordReader(height, width, channels, labelMaker);
        DataSetIterator dataIter;
        MultipleEpochsIterator trainIter;


        log.info("Train model....");
        // Train without transformations
        recordReader.initialize(trainData, null);
        dataIter = new RecordReaderDataSetIterator(recordReader, batchSize, 1, numLabels);
        preProcessor.fit(dataIter);
        dataIter.setPreProcessor(preProcessor);
        trainIter = new MultipleEpochsIterator(nEpochs, dataIter);
        network.fit(trainIter);

        // Train with transformations
        for (ImageTransform transform : transforms) {
            System.out.print("\nTraining on transformation: " + transform.getClass().toString() + "\n\n");
            recordReader.initialize(trainData, transform);
            dataIter = new RecordReaderDataSetIterator(recordReader, batchSize, 1, numLabels);
            preProcessor.fit(dataIter);
            dataIter.setPreProcessor(preProcessor);
            trainIter = new MultipleEpochsIterator(nEpochs, dataIter);
            network.fit(trainIter);
        }

        log.info("Evaluate model....");
        recordReader.initialize(testData);
        dataIter = new RecordReaderDataSetIterator(recordReader, batchSize, 1, numLabels);
        preProcessor.fit(dataIter);
        dataIter.setPreProcessor(preProcessor);
        Evaluation eval = network.evaluate(dataIter);
        log.info(eval.stats(true));

        if (save) {
            log.info("Save model....");
            ModelSerializer.writeModel(network,  "bird.bin", true);
        }
        log.info("**************** Bird Classification finished ********************");
    }
    private ConvolutionLayer convInit(String name, int in, int out, int[] kernel, int[] stride, int[] pad, double bias) {
        return new ConvolutionLayer.Builder(kernel, stride, pad).name(name).nIn(in).nOut(out).biasInit(bias).build();
    }

    private ConvolutionLayer conv3x3(String name, int out, double bias) {
        return new ConvolutionLayer.Builder(new int[]{3,3}, new int[] {1,1}, new int[] {1,1}).name(name).nOut(out).biasInit(bias).build();
    }


    private SubsamplingLayer maxPool(String name, int[] kernel) {
        return new SubsamplingLayer.Builder(kernel, new int[]{2,2}).name(name).build();
    }

    public static void main(String[] args) throws Exception {
        new BirdClassification().execute(args);
    }
}
The code can of course be optimized and if you've any suggestions, please let me know on the comment section. With the above parameters, I got the below results:

Our network claims to be 87% accurate, That could mean all sorts of different things.
This tells us that 87% of the time we guessed “Bird”, we were right! But it also tells us that we only found 87% (recall) of the actual birds in the data set. In other words, we might not find every bird but we are pretty sure about it when we do find one!
Visualize and debug our network
while training, you can check (on real time) the current network status and progress of training. open http://localhost:9000 for that:
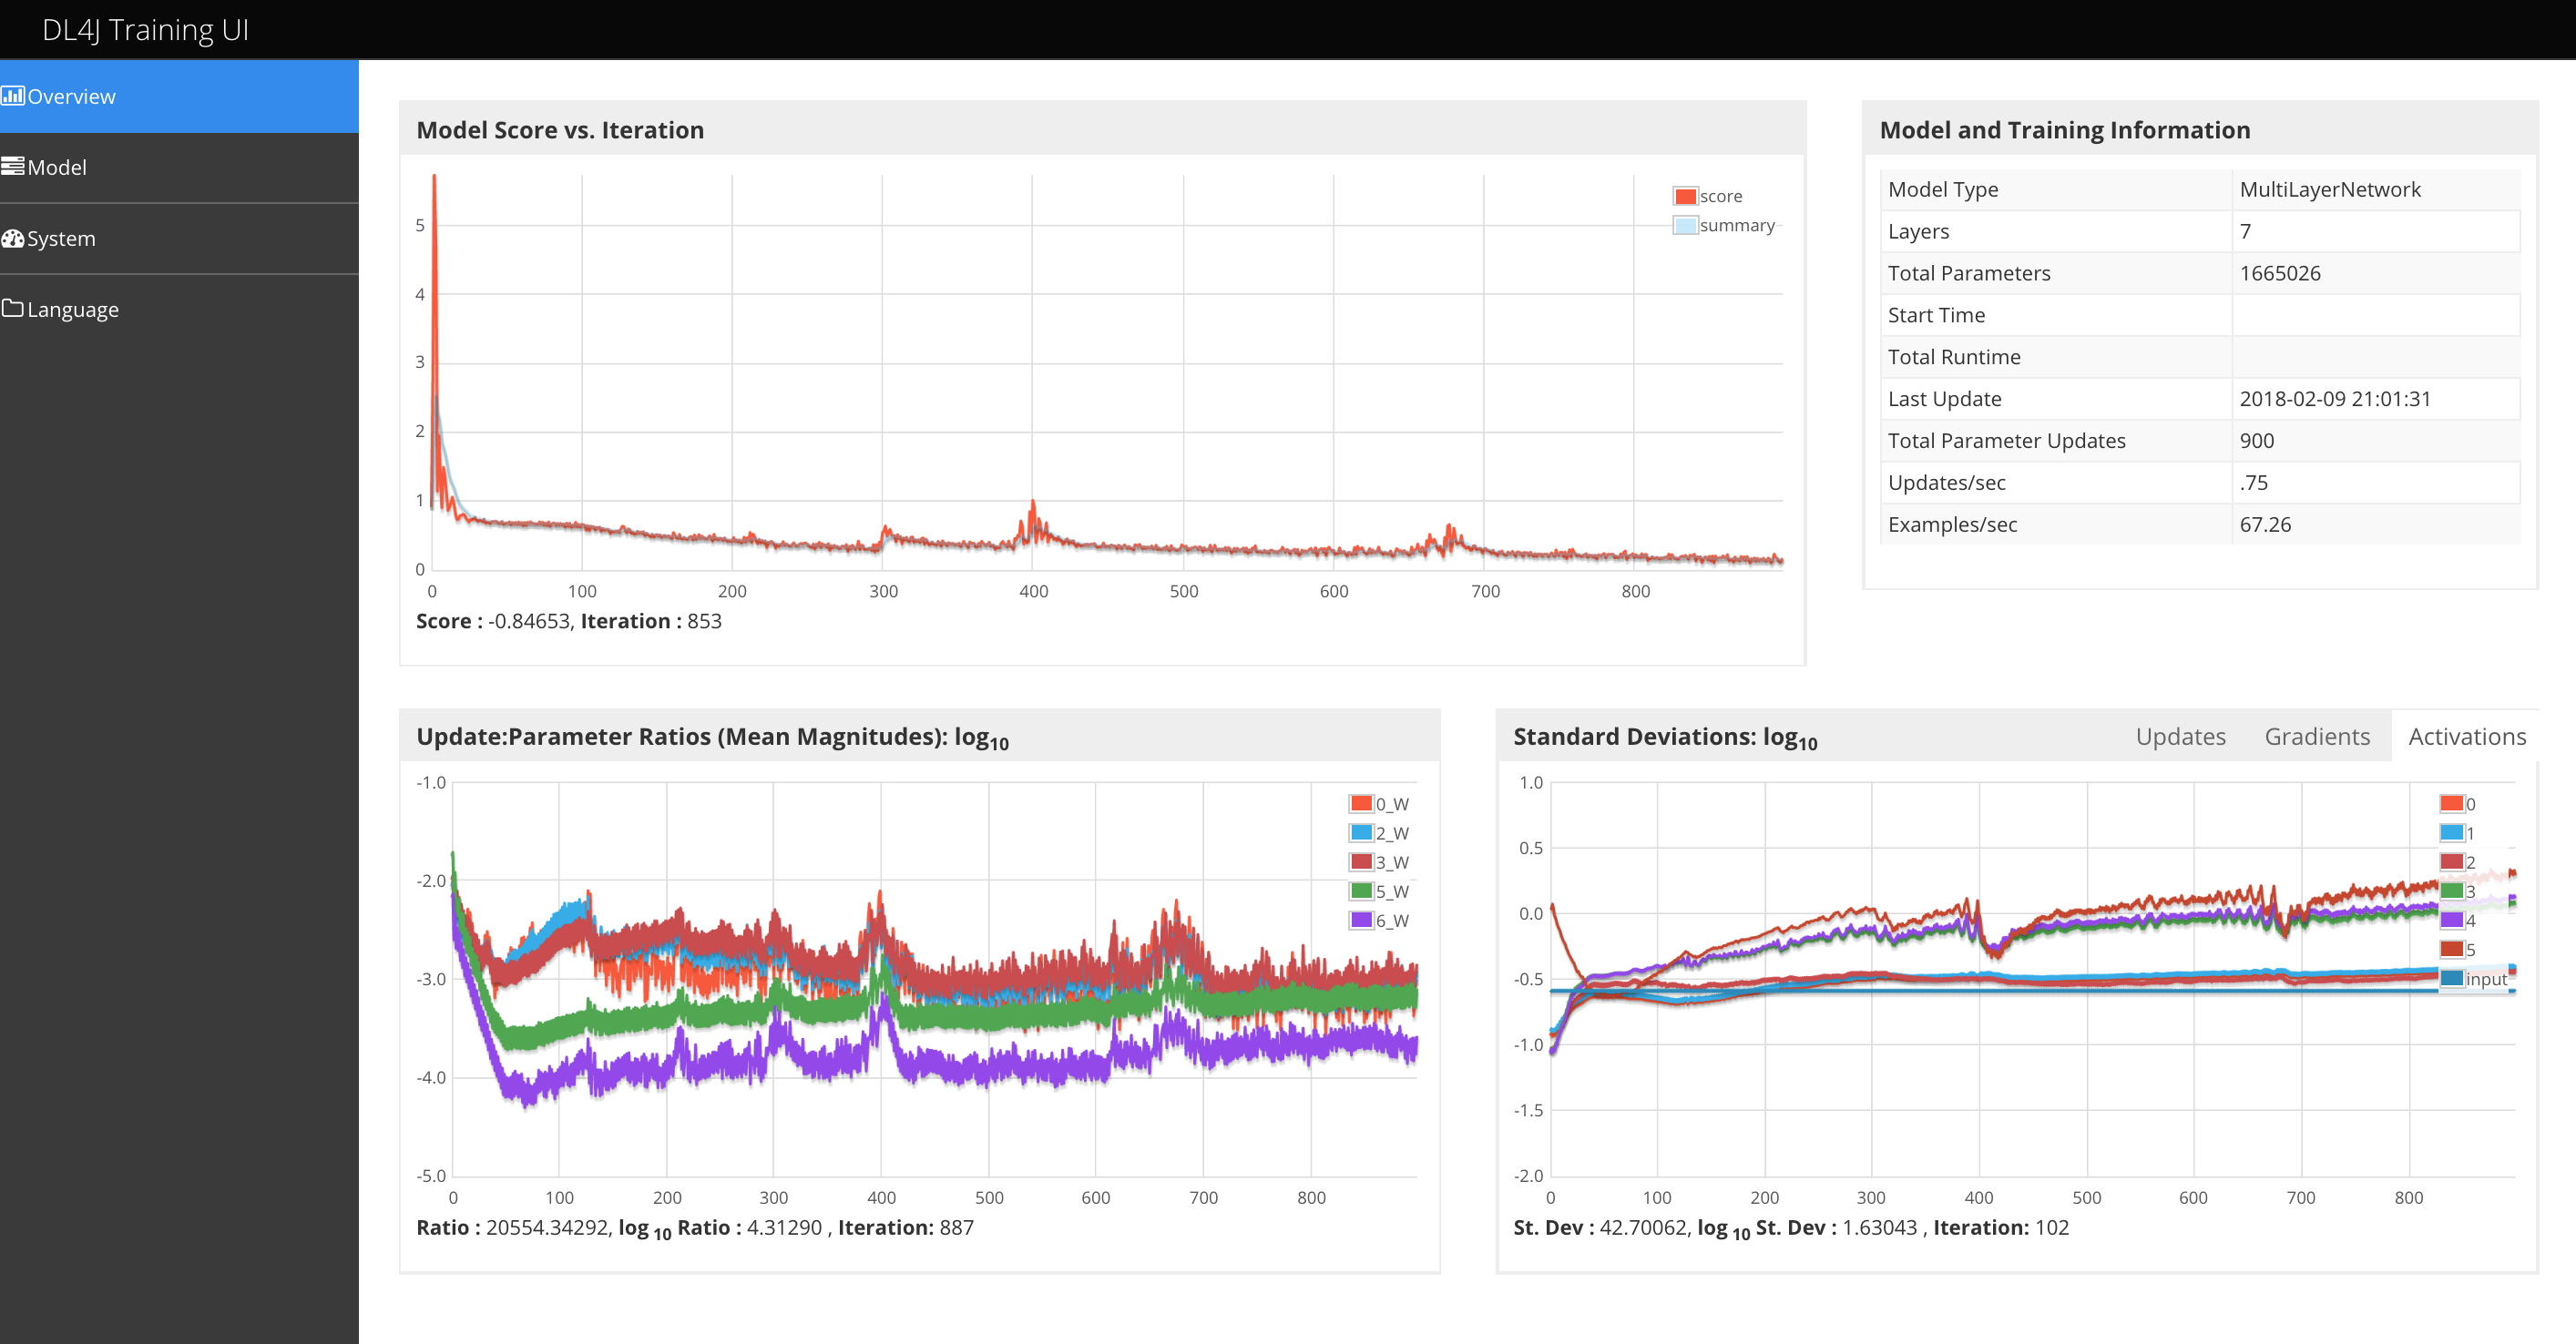
The overview page contains the following information:
- Top left: score vs iteration chart - this is the value of the loss function on the current minibatch
- Top right: model and training information
- Bottom left: Ratio of parameters to updates (by layer) for all network weights vs. iteration
- Bottom right: Standard deviations (vs. time) of: activations, gradients and updates
Using our saved model
I went a little bit further and imported the model on a web app, but the results were far away from precise :D, which is completely normal:
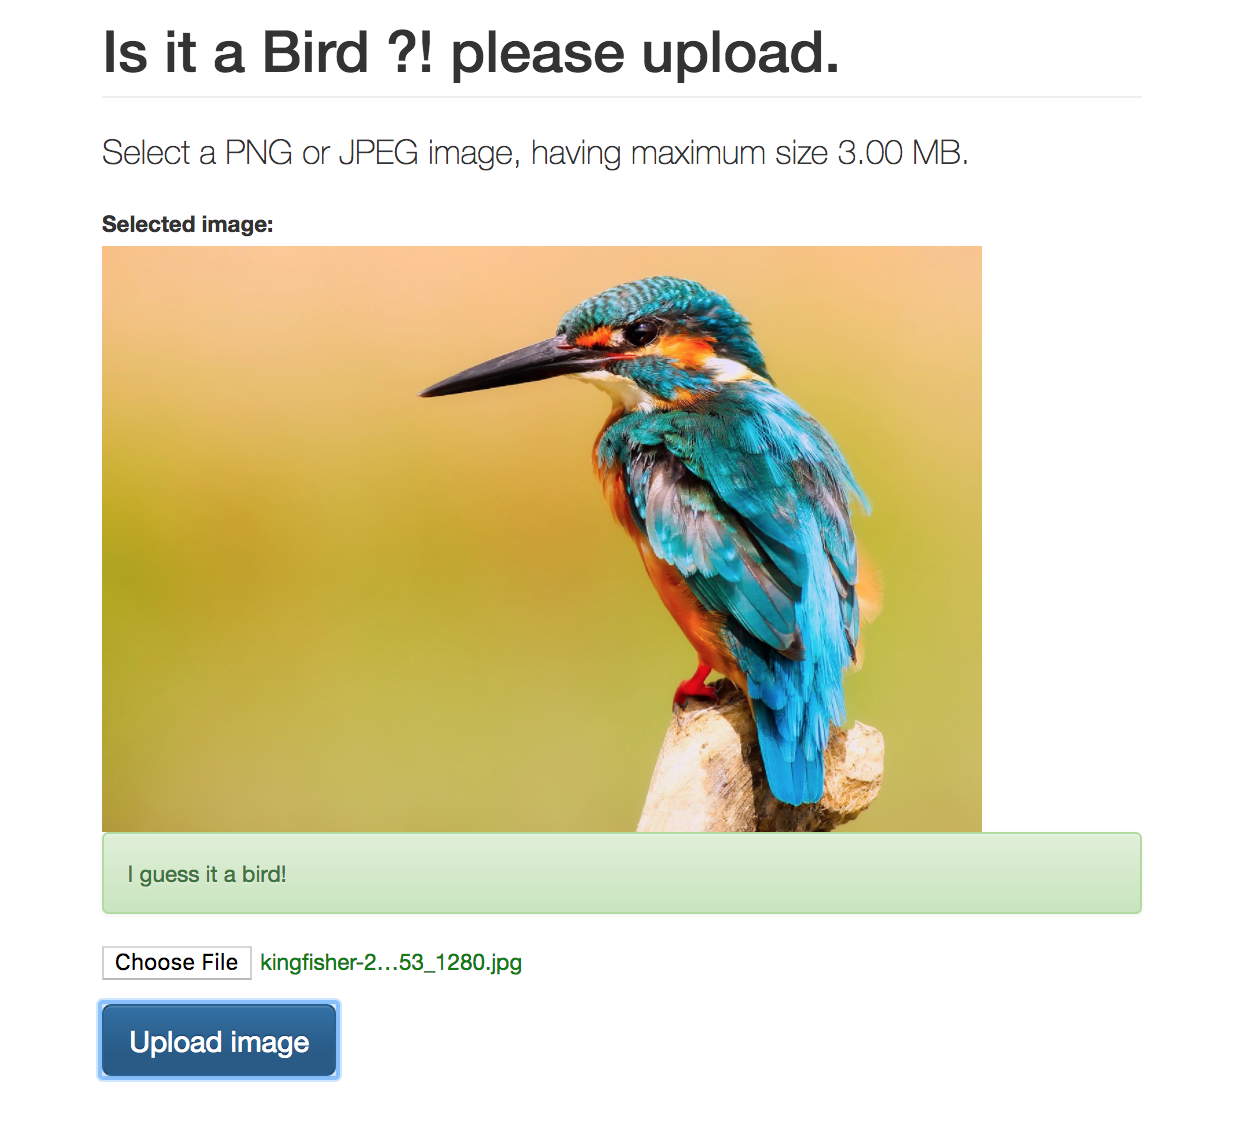
As explained above, our dataset is pretty small for real-world applications. If we want Google-level performance, we need millions of large images. In machine learning, having more data is almost always more important that having better algorithms.
the snippet to import the saved model is below (spring):
@Service
public class BirdService {
    @Autowired
    ResourceLoader resourceLoader;

    MultiLayerNetwork model;

    @PostConstruct
    private void init() throws IOException{
        Resource resourceModel = resourceLoader.getResource("classpath:bird.bin");
        File savedModel = resourceModel.getFile();
        model = ModelSerializer.restoreMultiLayerNetwork(savedModel) ;
    }

    public Boolean birdClassifier(MultipartFile imageFile) throws IOException{
        NativeImageLoader loader = new NativeImageLoader(32, 32, 3);
        INDArray image = loader.asMatrix(convert(imageFile));
        ImagePreProcessingScaler preProcessor = new ImagePreProcessingScaler(0, 1);
        preProcessor.transform(image);
        INDArray output = model.output(image, false);
        System.out.println(output);
        return output.getFloat(0) > 0.8;
    }

    private File convert(MultipartFile file) throws IOException {
        File convFile = new File(file.getOriginalFilename());
        convFile.createNewFile();
        FileOutputStream fos = new FileOutputStream(convFile);
        fos.write(file.getBytes());
        fos.close();
        return convFile;
    }
}
Final words
If you're a ML newbie like me, you've for sure yourself asked yourself: how do I know which steps I need to combine to make our image classifier work?
Well, you have to answer this by doing a lot of experimentation and testing. You might have to train 100 networks before you find the optimal structure and parameters for the problem you are solving. Machine learning involves a lot of trial and error!