Skaffold, OKE & OCIR!
If you're working on cloud-native apps and containers, you probably already noticed that, amid all features that containers offer, they added somehow a new later of complexity to the development workflow! We spend a great amount of time building container images, pushing them across registries, updating Kubernetes manifests, redeploying the application and checking if everything works as intended... even for the smallest changes. The feedback loop gets bigger and bigger!
One of the open source tools that helps to solve this issue, especially while working with kubernetes, is Skaffold! Skaffold is a command line tool by Google, that facilitates continuous development for Kubernetes applications. The goal is to help developers to focus on writing and maintaining code rather than managing the repetitive steps required during the edit-debug-deploy inner loop.
In this posts, I'm describing the steps to continuously deploy your cloud native apps, focus on coding and boost productivity, using Skaffold and Oracle Cloud, mainly OKE and OCIR.
Prerequisites!
Make sure that you've Docker installed in your machine, If not, you can either install Docker Desktop for Mac and Windows, or Docker engine for Linux users. This link describes the necessary step to guide you through.
Additionally, since we'll be interacting with K8S, we necessarily need to use the he Kubernetes command-line tool: kubectl. The complete guide on how to install and configure kubectl can be found here.
Installing Skaffold
Installing Skaffold is pretty straightforward. Below the details to configure Skaffold on Mac, Windows and Linux:
Mac
If you're familiar with Homebrew, just run the following command to setup Skaffold on your machine: brew install skaffold. Otherwise , run the below commands in your terminal that basically download and place the binary in the /usr/local/bin folder:
curl -Lo skaffold https://storage.googleapis.com/skaffold/releases/latest/skaffold-darwin-amd64
chmod +x skaffold
sudo mv skaffold /usr/local/bin
Linux
Linux users can run the following commands to install and configure Skaffold:
curl -Lo skaffold https://storage.googleapis.com/skaffold/releases/latest/skaffold-linux-amd64
chmod +x skaffold
sudo mv skaffold /usr/local/bin
Windows
If you're using Windows, you need to download the .exe file from here and place it under your PATH folder.
More details can be found on Skaffold's Getting Started Guide page.
Oracle Cloud configuration
Since you reading this, I suppose you already have an Oracle cloud account! If not, head over to the Always Free Services page and create one. Yes It's free... Forever (at least for now)!
Once done, We need to setup a kubernetes cluster and container registry. This can be easily done by accessing the Developer services from the side menu, under Solutions and Platform you can create and configure your OKE cluster and private OCIR! A detailled step by step guide, in-depth description of the processes can be found here and here.
OKE config
As any cloud service provider, Oracle cloud has their own command line tool to efficiently work, interact and manage with Oracle cloud Services. make sure to install and configure it following this link
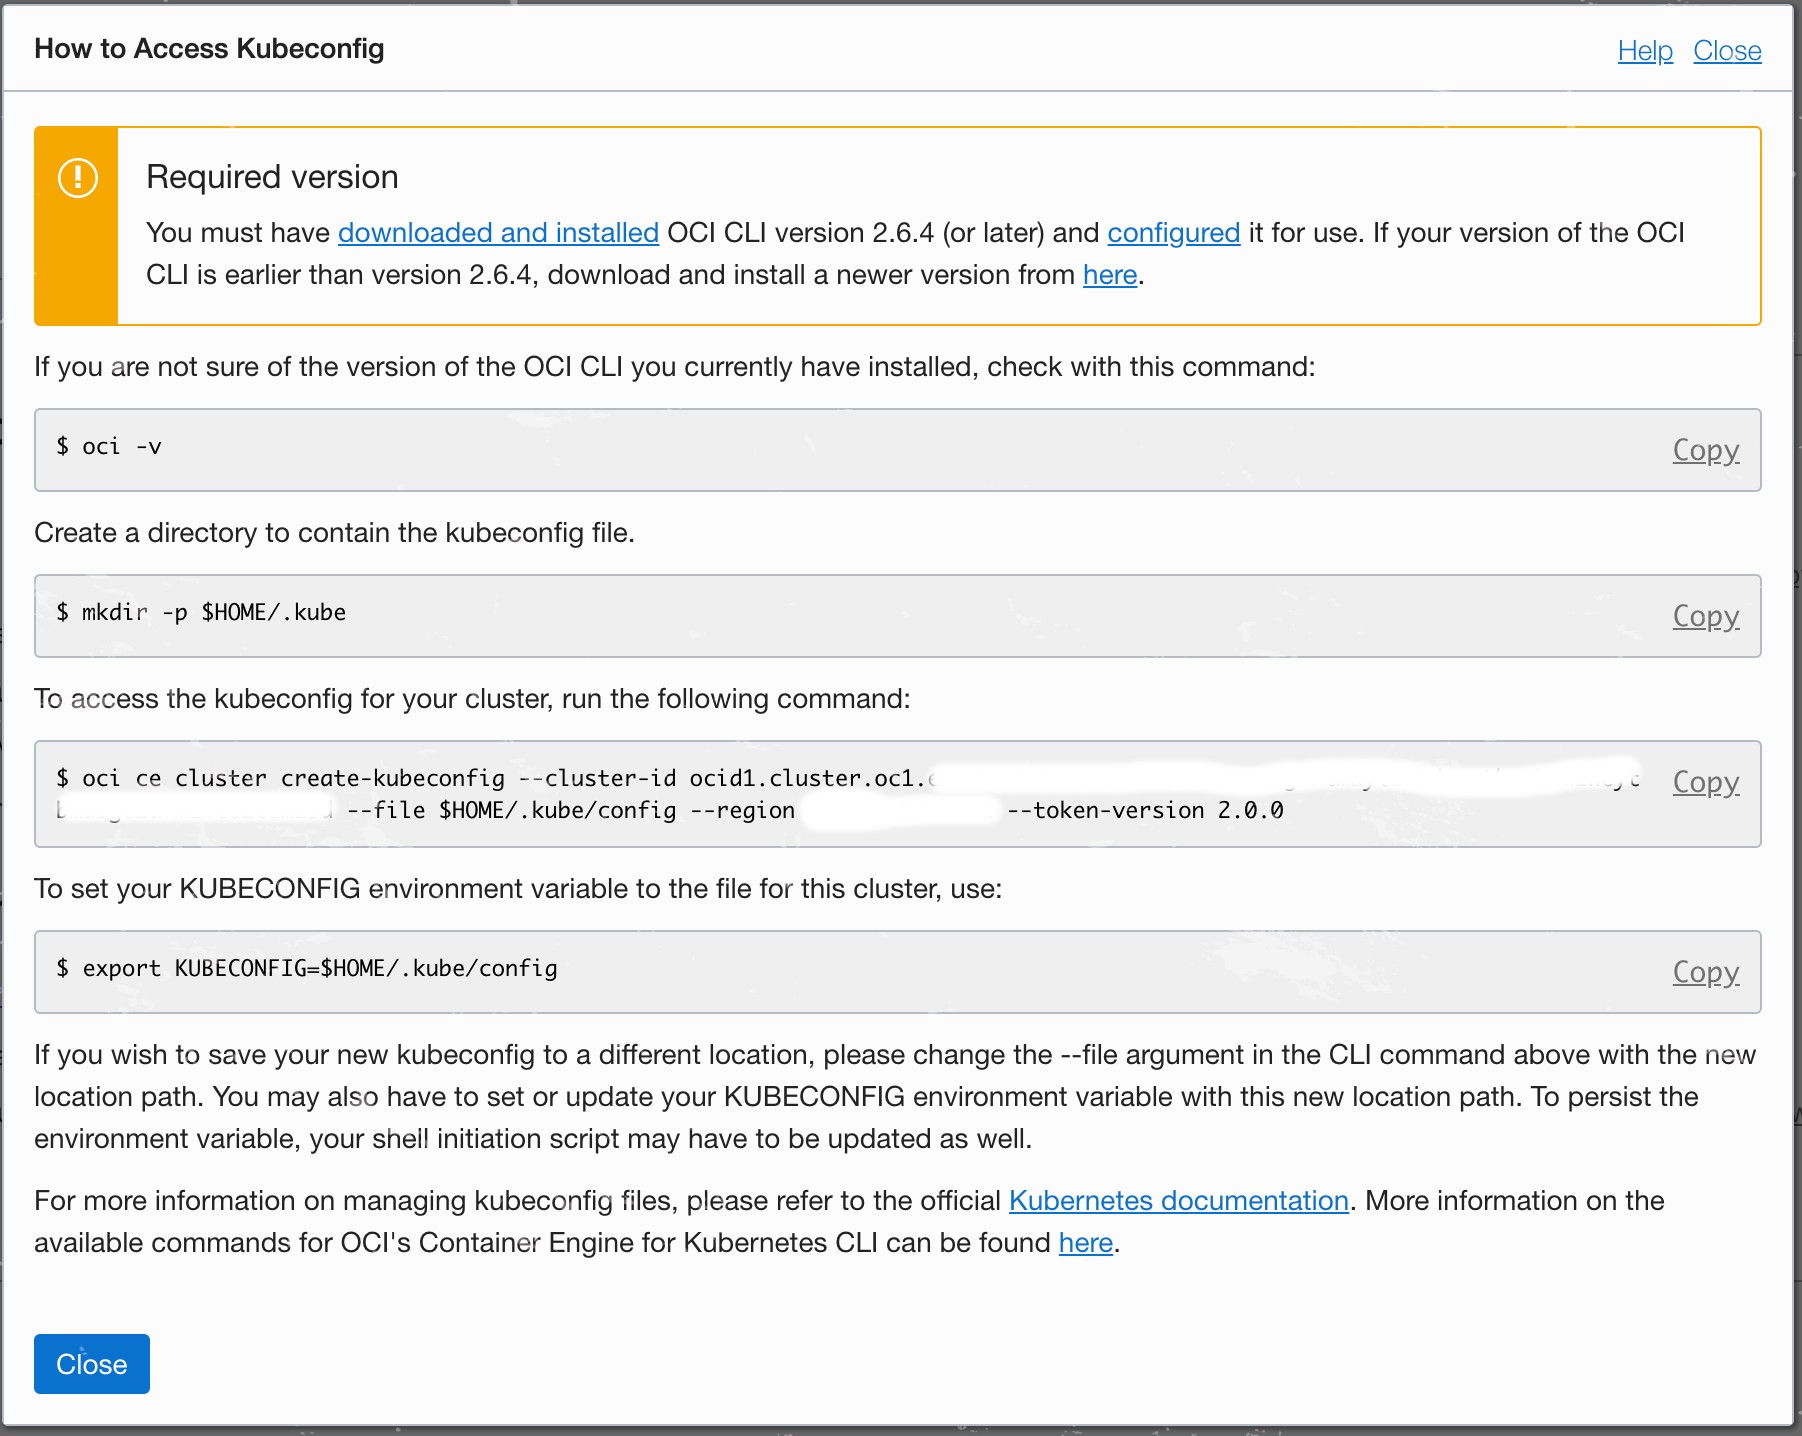
Once the OCI CLI setup completed go to your OKE Cluster page and hit the Access Kubeconfig button on top of the page. Following the instructions will help to create the correct kubectl configuration. Worth nothing to mention that the OCI CLI works with multiple contexts, which means that it will keep your previous kubeconfig intact while adding/merging the new config into it. This can be easily verified by running kubectl config view to check kubeconfig settings, or kubectl config get-contexts to list all your contexts.
The last step is to set the default context to your OKE cluster by running: kubectl config use-context <oke-cluster-id>
OCIR config
You should by now have created your private container registry in Oracle Cloud. Make sure its private, even if not mandatory, it is how the way things should be, from a security standard and an enterprise perspective.
OCIR stands for Oracle Cloud Container Registry. It's basically an Oracle-managed registry for your Docker container images. You can read more about Docker Registry here.
Since our OCIR is private, we need to configure a token to access it for both pushing and pulling our containers images. Head over to your Oracle Cloud console page, click User Settings under your profile image, hit the Auth Tokens page and then click the Generate Token button. Carefully note down the generated token as we will need it in the next steps.
We need afterward to make sure that we can access our registry with the generated token. For that we login to OCIR from Docker cli by typing the following command in your terminal:
docker login <region-key>.ocir.io
where <region-key> is the key for the Oracle Cloud Infrastructure Registry region you're using. This link contains a list of oracle cloud region keys.
You will be prompted to provide a username and password! The username follows the format: <tenancy-namespace>/<username>. If your tenancy is federated with Oracle Identity Cloud Service, use the format <tenancy-namespace>/oracleidentitycloudservice/<username>. Note that tenancy-namespace is the auto-generated Object Storage namespace string of the tenancy containing the repository from which the application is to pull the image. The password is the auth token you copied earlier.
If everything is fine, you should get a Login Succeeded message. If the login fails, try to verify and repeat the step above.
Now that we're sure that the registry is accessible, we create a Secret that will be used in our K8S manifests to pull the image from it! This can be achieved by running:
## An email address is required, but it doesn't matter what you specify
$ kubectl create secret docker-registry <secret-name> --docker-server=<region-key>.ocir.io --docker-username='<tenancy-namespace>/<oci-username>' --docker-password='<oci-auth-token>' --docker-email='<email-address>'
Hello World!
To put everything together, we'll be using an example from he Skaffold samples to check our setup. The example can be found here. The folder contains a single file go application, that prints Hello World! every seconds. To containerize the app, The Dockerfile uses multistage build feature to build the app in the first stage (builder) and copy and run the generated binary in the production/second stage.
The example also provide a simple k8s-pod.yaml to run the app in the K8S cluster. This file need to be updated by specifying the Docker secret created to access the OCIR, using imagePullSecrets. Below the updated file:
apiVersion: v1
kind: Pod
metadata:
  name: getting-started
spec:
  containers:
  - name: getting-started
    image: skaffold-example
  imagePullSecrets:
  - name: ocirsecret
Finally, you can either change the skaffold.yaml file to match the new registry or use --default-repo flag to prefix the image name with the OCIR registry, with no no manual YAML editing! The Skaffold config file contains many stages specifying the steps to build and deploy your application. More details can be found here
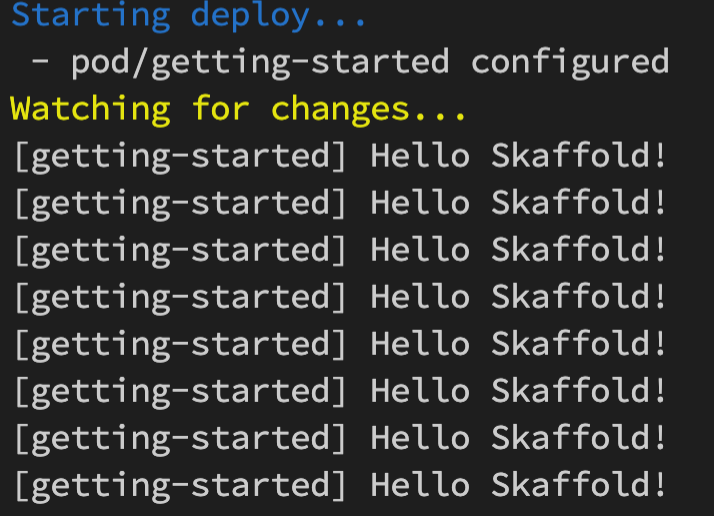
Now, you can continuously develop, deploy and test your changes using:
$ skaffold dev --default-repo=<region-key>.ocir.io/tenancy-namespace>/<project-id>
You can make changes to the main.go file and skaffold will build a new image, push it to OCIR, deploy it on OKE and print you the logs!
Ressources:
- https://cloud.google.com/blog/products/application-development/kubernetes-development-simplified-skaffold-is-now-ga
- https://docs.cloud.oracle.com/en-us/iaas/Content/Registry/Tasks/registrypullingimagesfromocir.htm
- https://www.ateam-oracle.com/continuous-deployments-with-skaffold-on-oracle-cloud-infrastructure-container-engine-for-kubernetes-oke